Wordpress Integration
by Maneesh K V
A simple way to create good impression with your online content is by customizing/ creating your own theme with the CMS that you are using.
Here we will learn the steps involved in creating a custom theme with Wordpress CMS.
Create a project folder (with the name of your choice) and after creating all the necessary files as mentioned in this tutorial, transfer the project folder to the web server (via FTP) in wp-content/themes directory in wordpress. There is an alternative approach of importing a theme from the admin module which is mentioned at the end of this tutorial.
Following files are required in the project folder for your theme to be working with wordpress:
1) header.php 2) index.php 3) sidebar.php 4) functions.php 5) page.php 6) single.php 7) footer.php 8)style.css
Our main page has to be divided into four sections (header.php, index.php, sidebar.php, footer.php).
A) header.php
Header section should be in header.php (all css files links, theme title and blog info will go here).
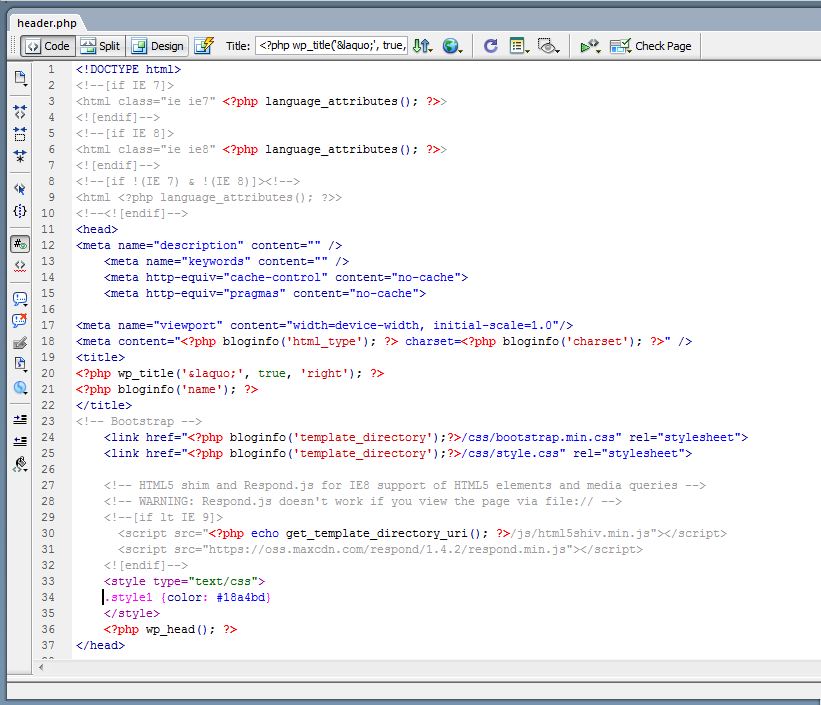
<?php wp_head(); ?> Ensure to put this statement in the header before </head> tag to include the wordpress files.
B) sidebar.php
This section is for adding widgets (we can add menus, pages etc.).
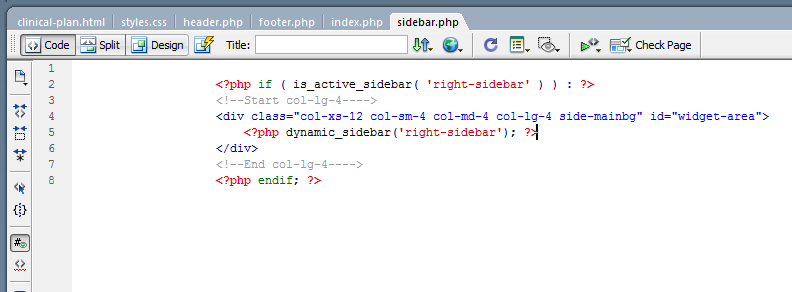
            <?php if ( is_active_sidebar( 'right-sidebar' ) ) : ?>

              <div  class="side-mainbg" id="widget-area">

              <?php  dynamic_sidebar('right-sidebar'); ?>

              </div>

<?php endif; ?>

        	This code is written for getting the activated widget.
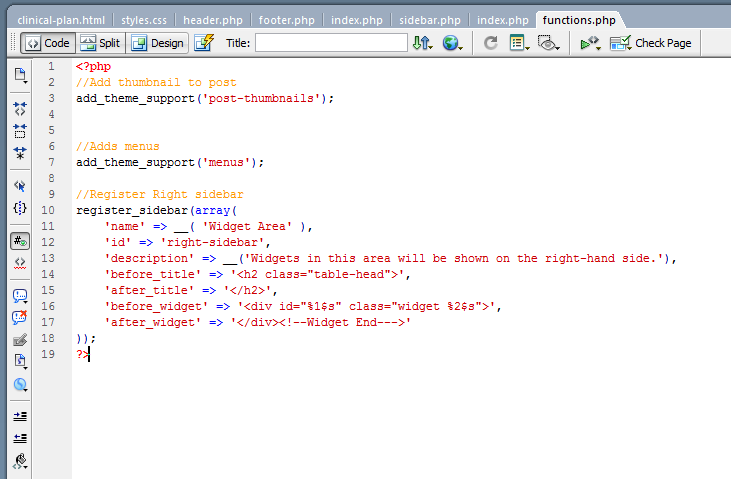
//Register Right sidebar
register_sidebar(array(
'name' => __( 'Widget Area' ),
'id' => 'right-sidebar',
'description' => __('Widgets in this area will be shown on the right-hand side.'),
'before_title' => '<h2 class="table-head">',
'after_title' => '</h2>',
'before_widget' => '<div id="%1$s" class="widget %2$s">',
'after_widget' => '</div><!--Widget End--->'
));This code is written in functions.php for registering the widget.
C) index.php
This section is the main page. Here we can get the latest posts, updates etc.
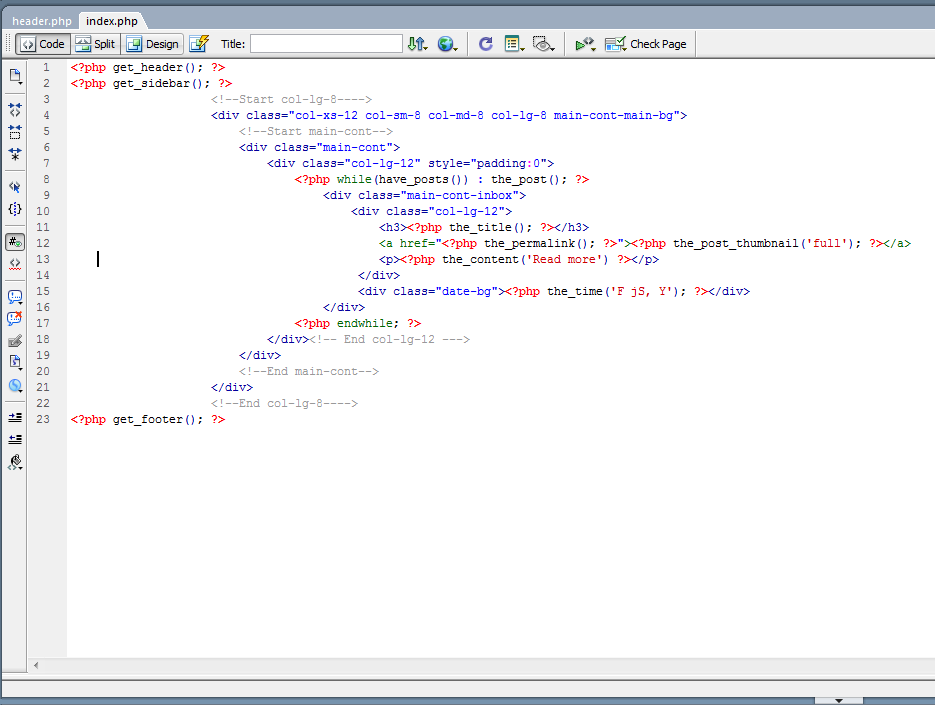
<?php get_header(); ?> , <?php get_sidebar(); ?> , <?php get_footer(); ?> - Add these statements in this section at the appropriate locations.
-
Few important functions:
- 1) <?php the_title(); ?> This for getting the post titles.
- 2) <h2> <a href="<?php the_permalink(); ?>"></a></h2> This for getting the post link.
- 3) <a href="<?php the_permalink(); ?>"><?php the_post_thumbnail('full'); ?></a> This for getting the uploaded images.
- 4) <?php the_content('Read more') ?> This for getting the latest post (contents).
- 5) <?php comments_popup_link( 'Leave reply', '1 Comment', '% Comments' ); ?> This for giving reply. On click, control goes to reply page.
- 6) <?php the_time('F jS, Y'); ?> This for getting the uploaded date.
- 7) <a href="<?php comments_link(); ?>"></a> This for getting the comments link.
- 8) <?php comments_number('0','1','%'); ?> This for getting the comments number.
- 9) <?php the_author_posts_link(); ?> This for getting the author of the post.
- 10) <?php echo esc_url( home_url( '/' ) ); ?> This is the home url. We can provide it in the home link and logo.
D) footer.php
All java script files are included in this page. Also all close tags are put here.
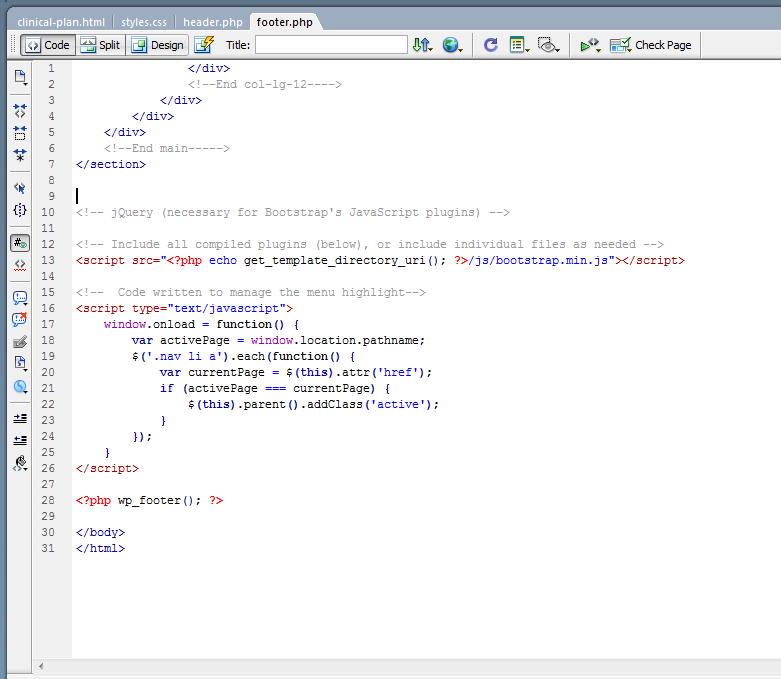
<?php wp_footer(); ?> Ensure to put this statement before </body> tag for proper working of all included plugins.
E) functions.php
Add all necessary functions in the function page.
F) page.php and single.php
Have the default page template (page.php) similar to the index page, which is needed for content to be displayed on a page.
Same applies for single.php.
<link href="<?php bloginfo('template_directory'); ?>/style.css" rel="stylesheet" > This for getting files from local source.
<img src="<?php echo get_stylesheet_directory_uri(); ?>/img/fb1.png"> This for getting image source.
<script src="<?php echo get_template_directory_uri(); ?>/js/bootstrap.min.js"></script> This for getting javascript files.
1) <?php wp_head(); ?> We should add this in header page. Every theme should have a call to wp_head() somewhere in the <head> section.
Importing a theme
Apart from directly copying the projet folder to wordpress, a theme can also be imported from the admin module. On login to the admin module, there is a option to add new theme. When that is selected, the system prompts you to select the theme file which should be the zipped version of your project folder.
Once the file is uploaded, the theme will be listed in the themes list. You can include screenshot.png i.e. theme image in the project folder which will show up for your theme while displaying the list. You have to activate the theme for it to reflect in your web page.
Thank you!